Being in lock down for the past few weeks made me ask the question you’re probably asking yourself:
How would I draw a vector coronovirus icon?
So I came up with this quick and easy Inkscape icon tutorial for drawing a vector coronavirus.
Let’s begin.
Thinking Like A Designer
Apply The Golden Rules of Design to Hack Visual Composition, Unlock Your Creative Self, and Transition Into a Rewarding Path or Career
Stop wasting time learning unnecessary skills from random tutorials and start learning what matters the most in design.

Step 01: Draw the Spikes
Coronaviruses have spikes, called glycoprotein spikes. We will draw our model spike and will reuse it to form the other spikes.
1. Create the Main Structure
- Draw a square with the Square Tool.
- Using the tool’s nodes, round the corners.
- Finally, turn the object into a path (use the button or Path > Object to Path).
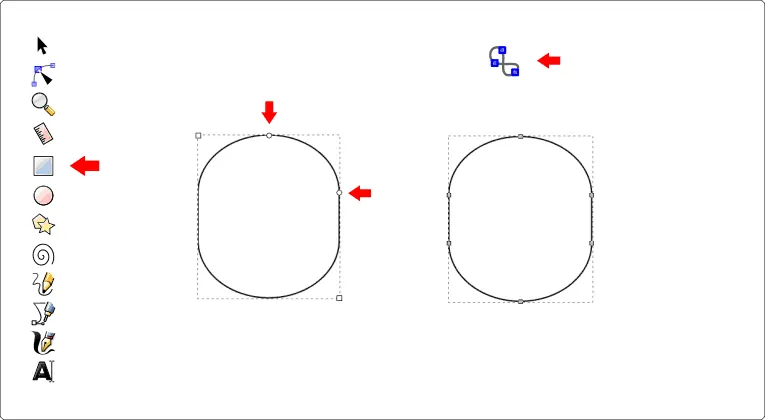
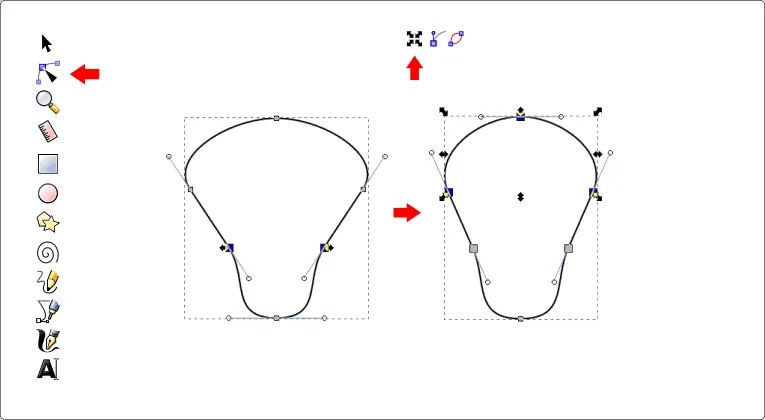
2. Transform Nodes to Shape the Spike
- Using the Node Editing tool, select the lower two parallel nodes.
- Make sure to turn on the Transform Nodes mode.
- Pressing SHIFT, grab one of the transformation handles and squeeze toward the center to make that end narrower.
- Grab the three upper nodes and do they same, outwards and upwards, until you get a shape similar to the one shown.
- Play around, get a feel of how the nodes transform, and find the shape you want!
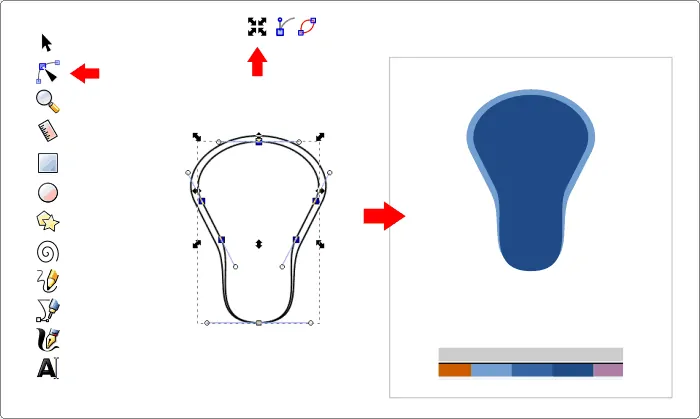
3. Create Spike Highlight
- Duplicate your main spike (CTRL + D).
- Select the upper five nodes of the duplicate and, using the Node Transform mode AND pressing both the SHIFT and CTRL keys, grab the upper right handle and slightly move downward.
- Finally, create an ellipse with the Circles tool.
- Covert it to a path (Path > Object to Path).
- Place it on top of the spike (drag and adjust the top node a little to make it fit).
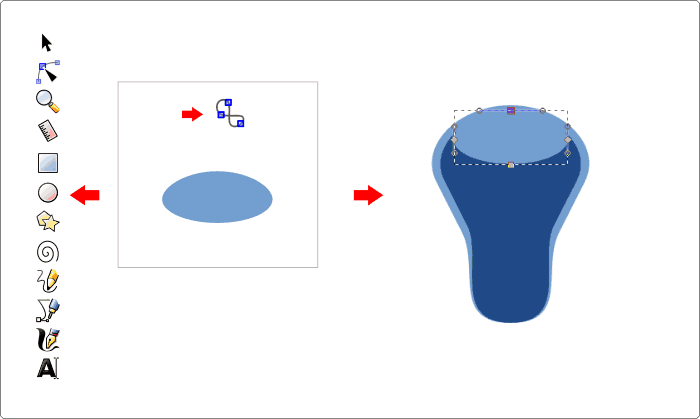
- Go ahead and group the whole thing by selecting all the parts and pressing CRTL + G (or Object > Group).
Step 02: Create the Body (Virus Envelope)
Now, we will create the sphere-like envelope to which the spikes are attached.
Thinking Like A Designer
Apply The Golden Rules of Design to Hack Visual Composition, Unlock Your Creative Self, and Transition Into a Rewarding Path or Career
Stop wasting time learning unnecessary skills from random tutorials and start learning what matters the most in design.

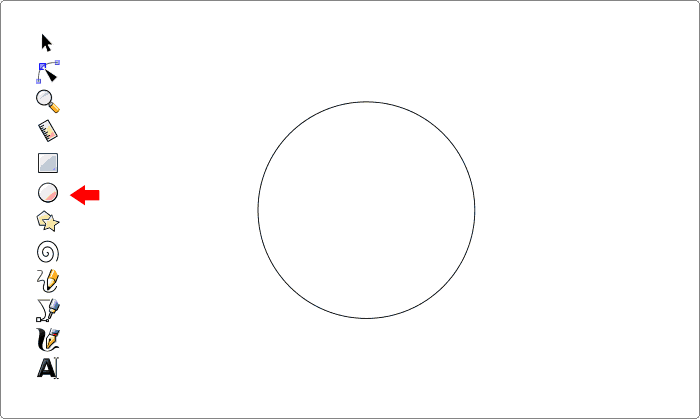
1. Create the Circular Structure
- First, pressing both the SHIFT and CRTL keys, create a circle with the Circles tool.
- The CTRL key locks the aspect ratio to create a perfect circle.
- The SHIFT key makes the circle grow from its center.
2. Duplicate and Color the Circles to Create the Virus Envelope
- Now, select the Transform tool. Click the circle twice to reveal its rotation handles (the first click reveals its scale and move handles).
- Notice how a tiny cross appears at the circle’s center (this is the circle’s center of rotation).
- Move the cross to the upper left segment of the circle, touching its stroke.
- Next, duplicate the circle (CRTL + D) and:
- Pressing the CTRL key, grab the lower right transformation handle and drag in a left-upward motion to reduce de circle’s size while it’s still aligned with the biggest circle’s upper left segment.
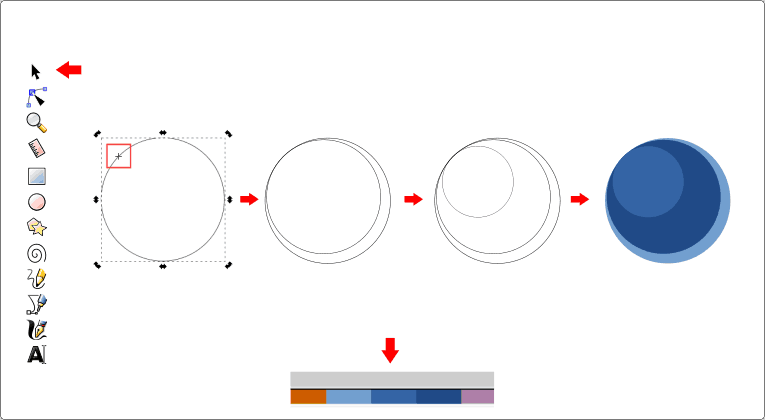
- Repeat this procedure one more time until you have three nested circles.
- Finally, remove the circles’ strokes and add fill colors, following the pattern shown.
Step 3: Assemble the Virus Structure
Now, we will finish the coronavirus vector icon by duplicating the spike we created and placing around the virus envelope.
1. Place the Spike in the Virus Envelope
- Take the model spike you created and place at the top center segment of the circular structure.
- Duplicate it (CRTL + D).
- Change its center of rotation to the lower-center part of the stem (its base).
- This will let you rotate the spike around the virus envelope to fit perfectly with its contour.
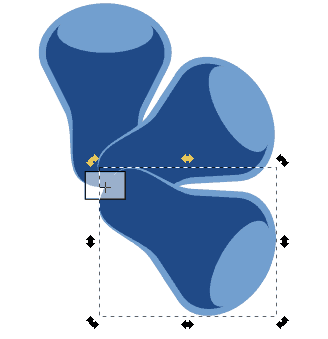
2. Duplicate and Transform
- Duplicate spikes to place around the virus envelope.
- Using the Transform tool, scale down some of the spikes.
- Give some of the spikes a solid fill color.
3. Place Spikes Around the Virus Evelope to Finish Icon
- Place the different spike duplicates around the virus, rotating using procedure described above.
- Note that some spikes appear beneath the virus envelope. Use the Lower / Raise Selection mode on the Transform tool to raise or lower accordingly.

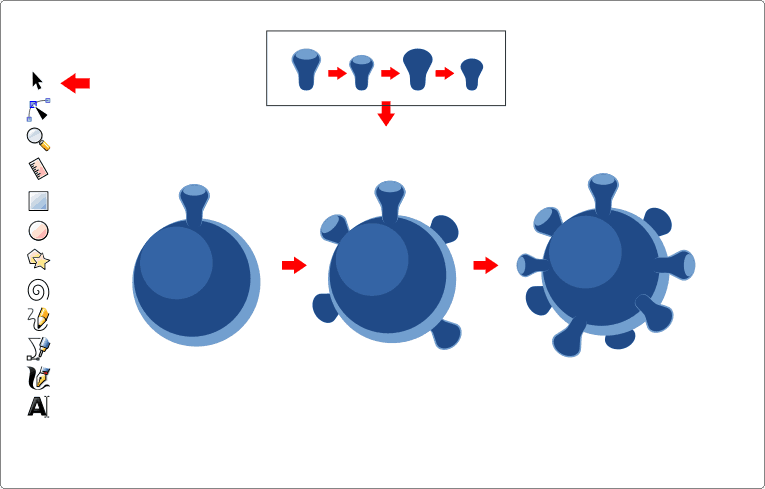
- Note that spikes that are on the back appear darker than those on the front.
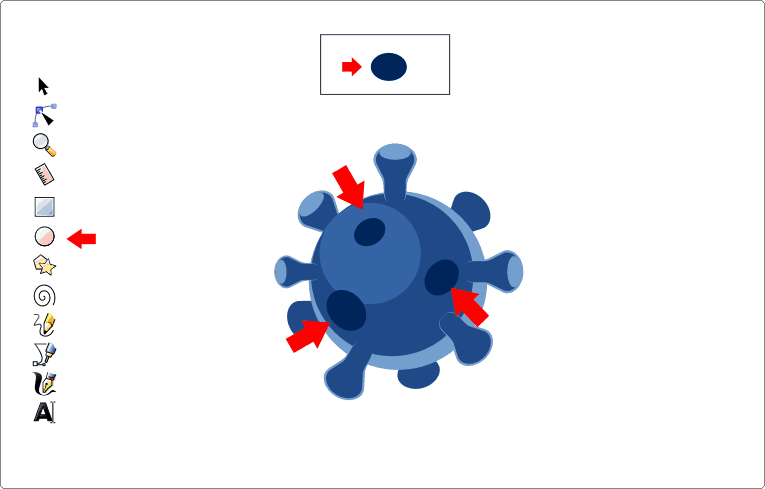
3. Finishing Details
- Create some ellipses to represent middle spikes and place in the center of the structure, like so:
Step 4: Present it Anyway You Like
- Change the colors of the spikes to fit your needs.
- Give a background for presentation.


All Done!
Thinking Like A Designer
Apply The Golden Rules of Design to Hack Visual Composition, Unlock Your Creative Self, and Transition Into a Rewarding Path or Career
Stop wasting time learning unnecessary skills from random tutorials and start learning what matters the most in design.

